Content Decay Report and SEO Content Refresh Workflow
Optimize your content with Rank Revival's powerful tools
In the below video and article, we walk through two key functions of Rank Revival: the Content Decay Dashboard and the collaborative Workflow System. The content decay dashboard is the main screen of the app, showing you which pages have experienced a drop in traffic over time.
The collaborative workflow system is designed to streamline your AI content optimization process, ensuring that you aren't repeatedly revisiting the same articles and allowing you to leave notes of what you've changed in the past.
Features Covered
- Using the content decay dashboard
- Checking and adding optimization notes
- Marking pages as 'In Progress' or 'Done'
What is content decay?
Content decay refers to the gradual decline in organic traffic, rankings, and overall performance of web content over time. This phenomenon occurs as content becomes outdated, less relevant, or outperformed by newer, more comprehensive content from competitors. Identifying and addressing content decay is crucial for maintaining and improving a website's SEO performance.
Initial Setup
Logging In and GSC Data Access
You'll first need to log in with your Google Search Console account so we can fetch your URL and click data. No credit card is required, and you get 10 free credit. Once logged in, the dashboard will pull your site's data from Google Search Console. If this is your first time integrating your site, the download process for 13 months of data could take a few minutes. For returning users, data refreshes should only take a few seconds.
Adding Missed URLs and Sorting Data
-
Add URLs: Ensure your sitemap is uploaded to include all your pages, especially those without any clicks or impressions in the last 13 months.
-
Data Sorting: The content Decay dashboard is sorted by lost clicks to identify articles losing traffic. You can also sort by total clicks to find articles with no recent activity.
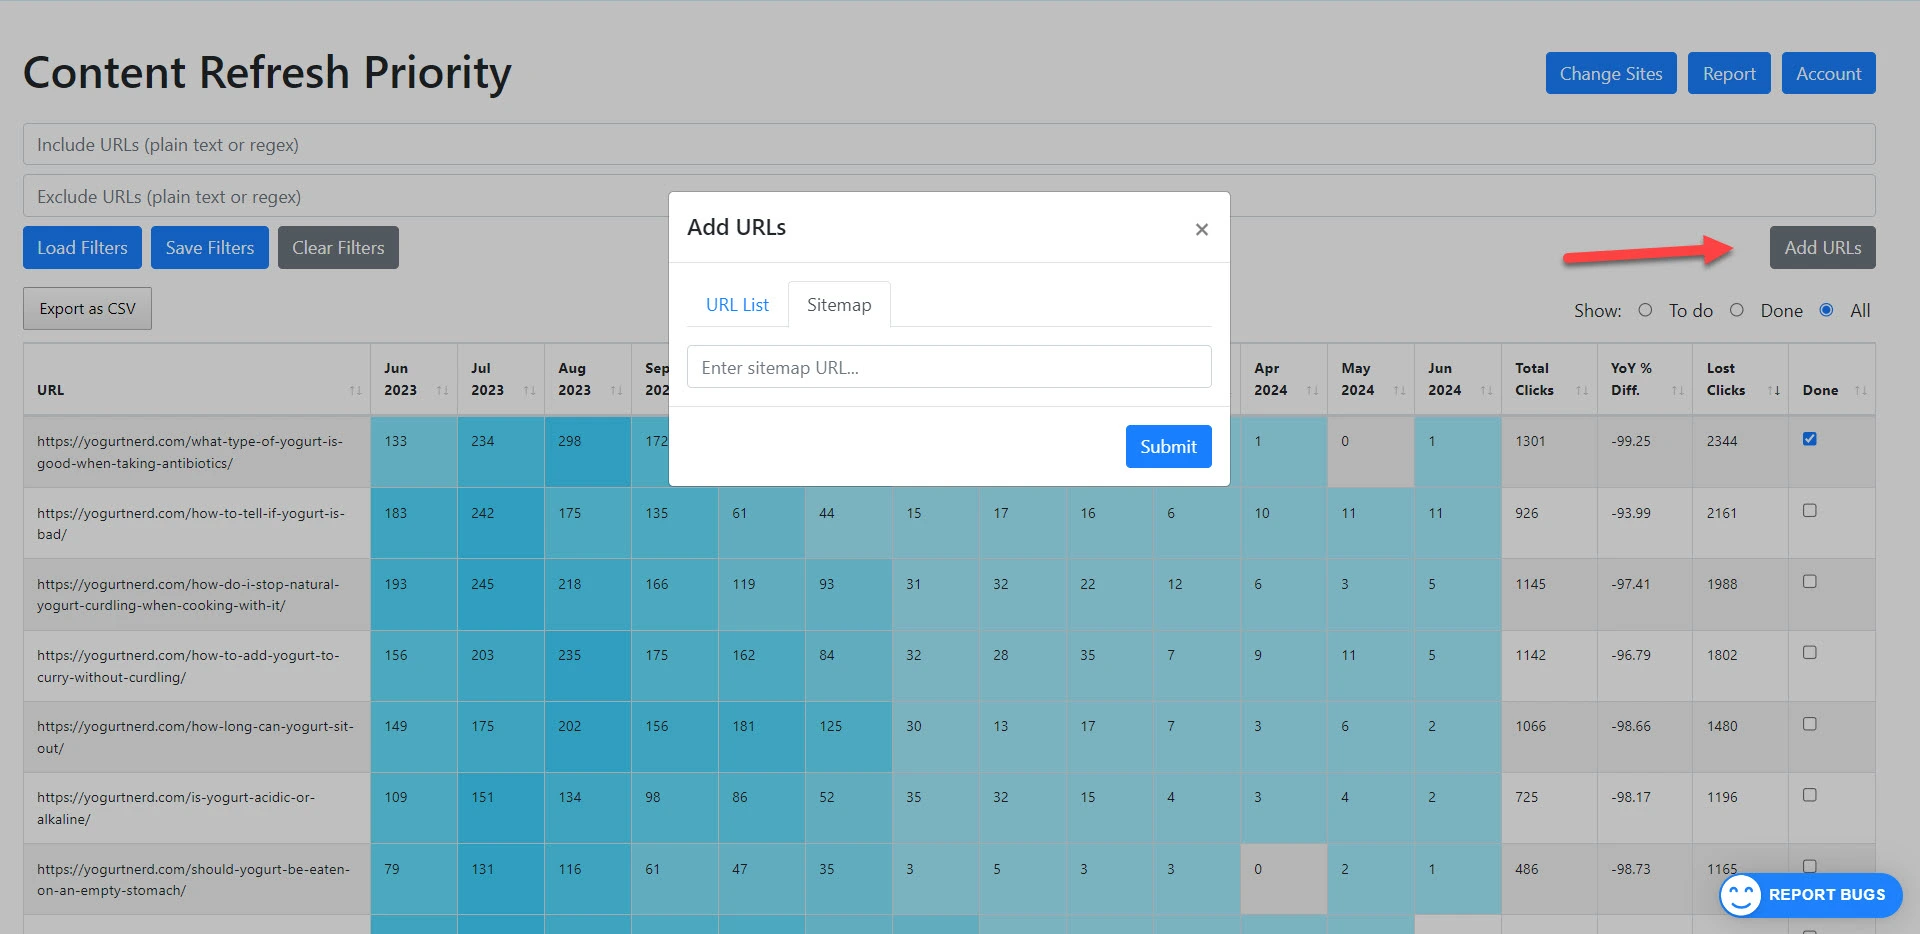
Note: Exporting this data into CSV format allows for external processing and additional analysis.
Content Decay Dashboard
At Rank Revival we don't believe in evergreen content. There's always going to be new competitors, Google updates and changes in intent that are driving your high ranking, high traffic pages down over time. Our content decay dashboard is designed to give you an always-on content audit. So you, your writers and editors always know which pages are decreasing in traffic and could do with a refresh.
Traffic Decline Visualization
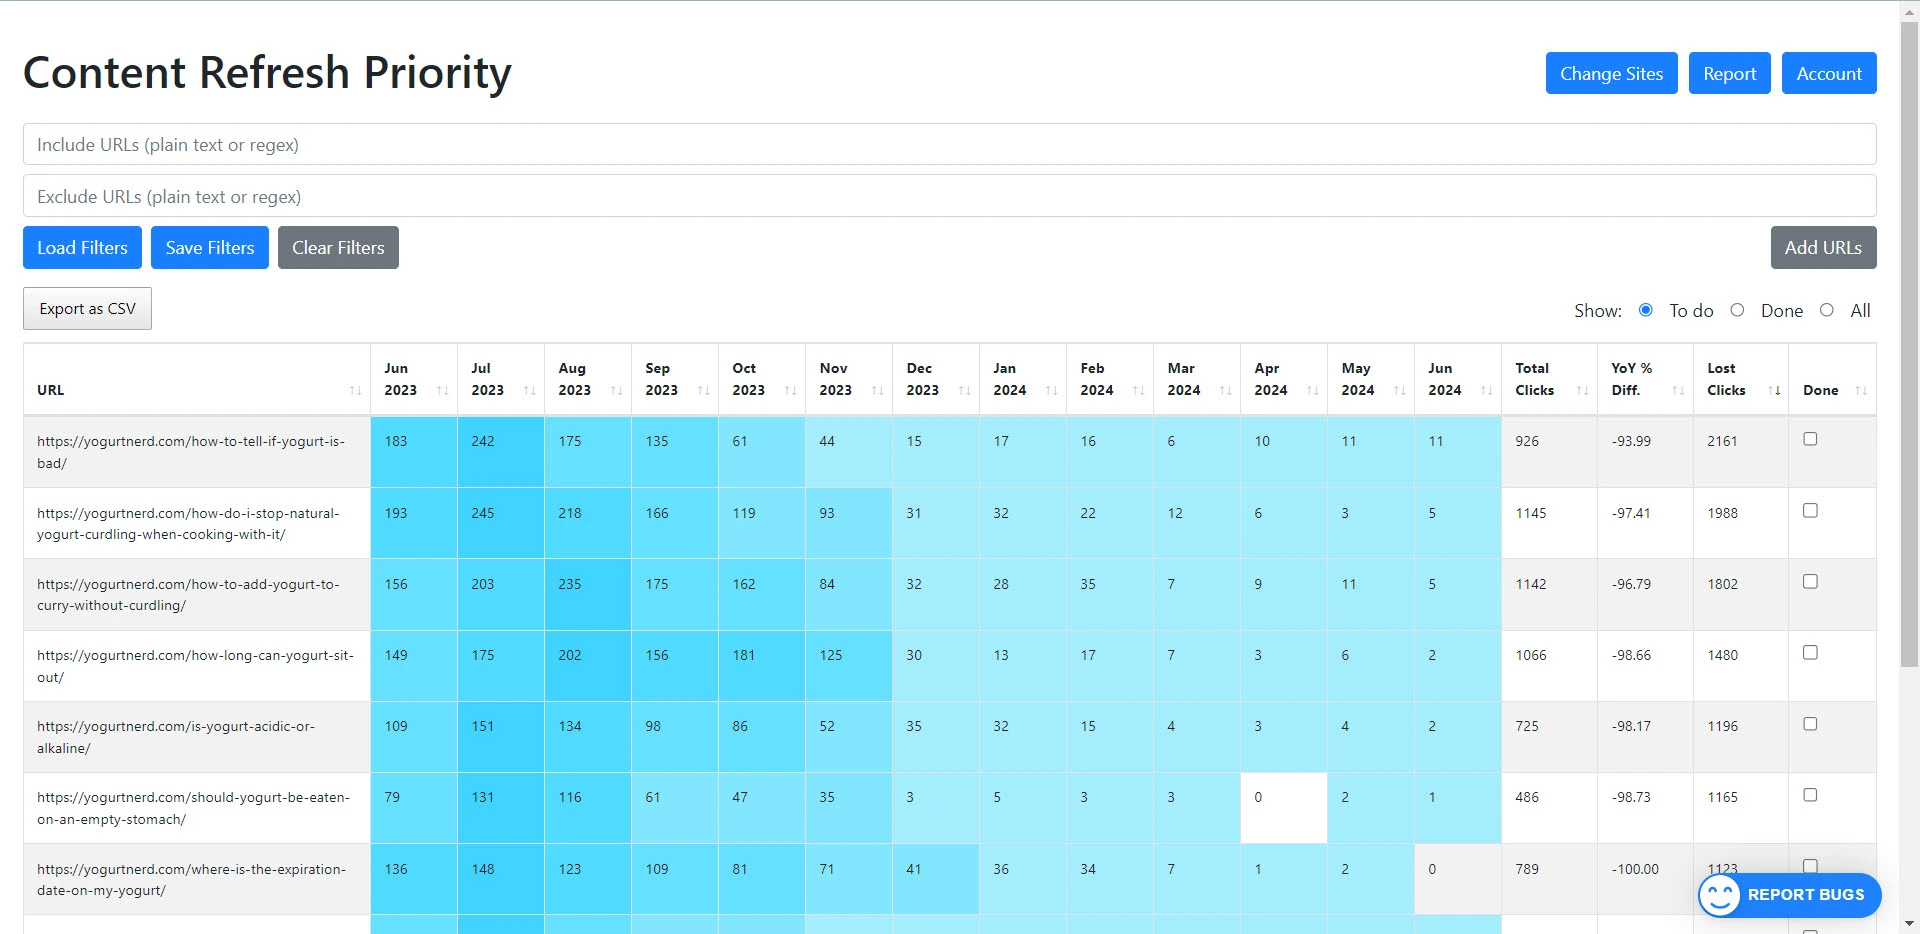
The traffic decline is illustrated through data from Google Search Console. The dashboard shows the highest traffic month compared to subsequent months. The "lost clicks" metric indicates how many potential clicks were lost compared to the peak traffic month. This helps identify which articles need attention due to declining numbers.
Understanding Lost Clicks
Lost clicks represent the difference between the peak traffic month and subsequent months. For example, if an article had 298 clicks during its best month, and subsequent months show fewer clicks, the total is the number of lost clicks, or content decay the article has experienced since its peak. This metric helps you quantify the drop in traffic and prioritize content for optimization.
Year-On-Year Traffic Comparison
In the year-on-year comparison, the dashboard shows traffic data for the same month across different years. This allows you to see how traffic has changed over time. For example, comparing June 2023 with June 2024, you can clearly see the percentage drop or increase in traffic.
Note: Pay attention to seasonal trends when making optimization decisions. Clicks could be trending down due to seasonality, when rankings are higher in reality. Use both Lost Clicks and YoY change when making decisions.
Collaborative Editing Features
Keeping track of which pages you've previous optimized is one of the most important functions within Rank Revival. These features allow you to have multiple writers or editors optimizing pages and noting down what they’ve changed, and you’ll always have a record for the future. If the page drops in traffic again, or if your changes didn’t increase traffic, try a different tactic during the next round of optimizations..
Managing Visibility to Editors
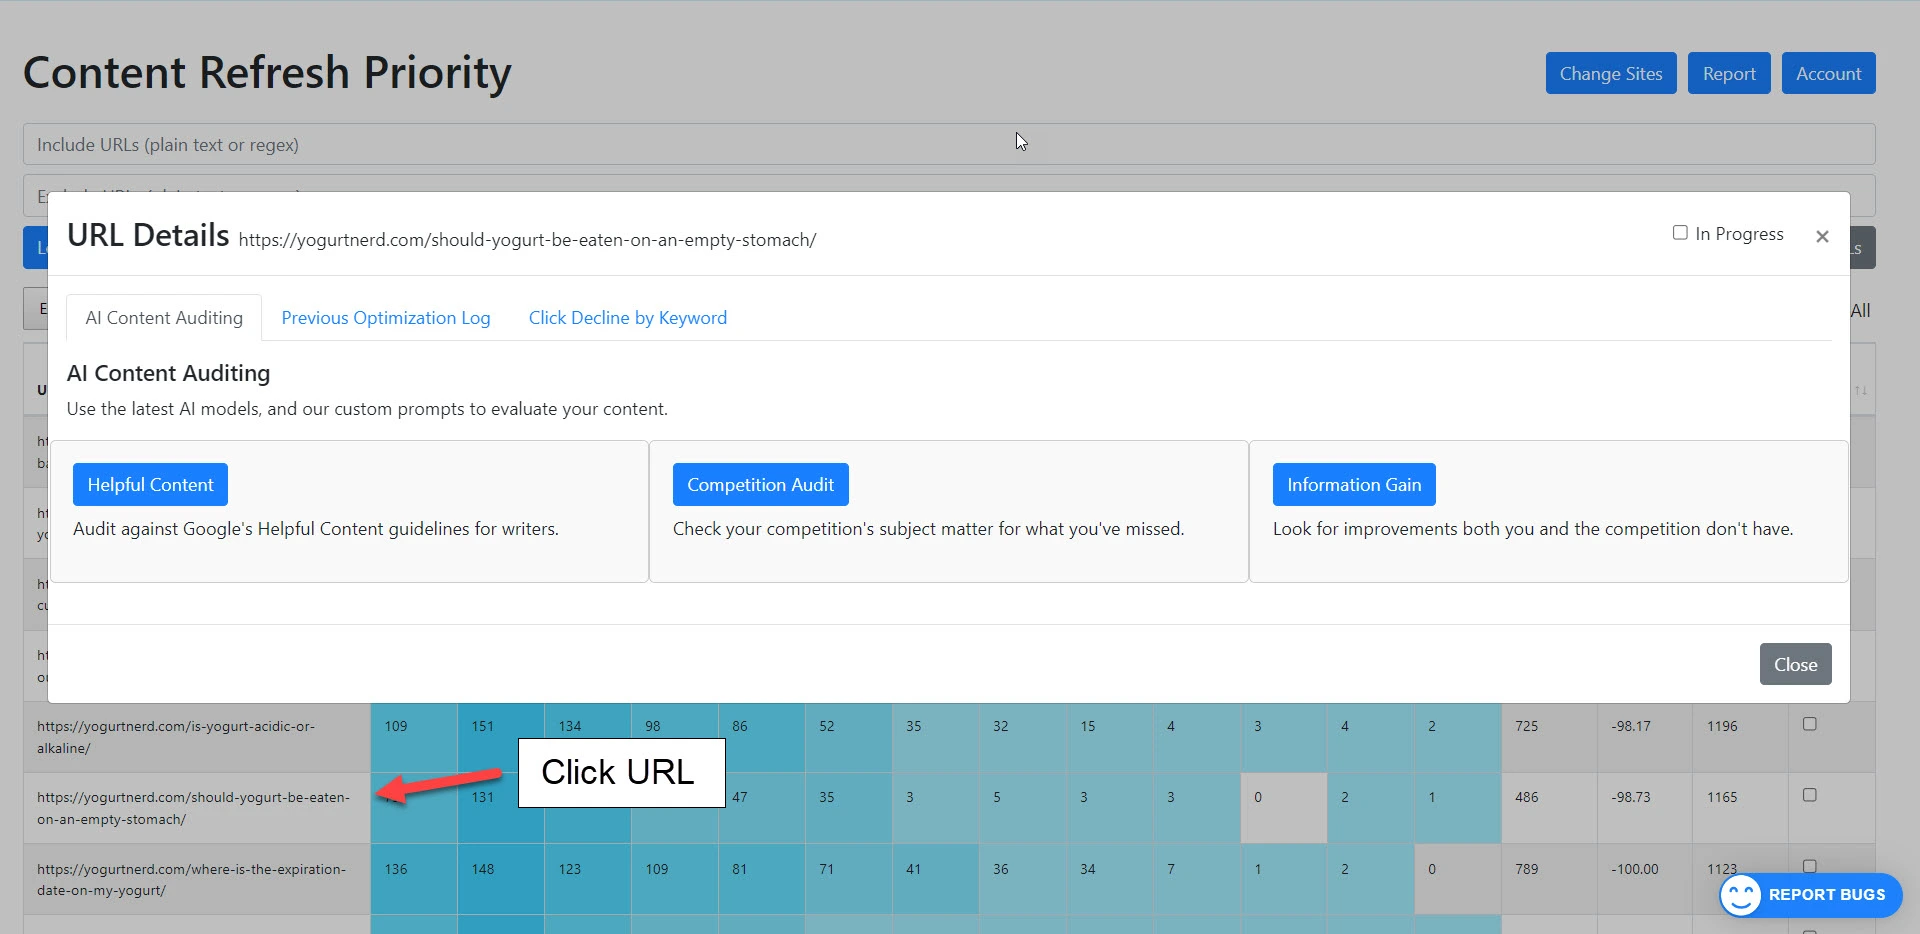
Managing the visibility of articles to editors is crucial for maintaining an efficient workflow. You can use and save filters based on URL structure, set articles to ‘In Progress’ and check the optimization logs for past optimization notes.
Steps to manage article visibility:
-
Filter Articles:
- Use filters to identify sections of the website you'd like to optimize.
- Save filters so users can reload existing views.
-
Mark In-Progress Articles:
- Mark articles as "In Progress" to indicate they are currently being worked on.
- This helps prevent multiple editors from making conflicting changes.
-
Check Optimization Logs:
- View previous optimization logs and notes to ensure editors are not duplicating efforts.
- Check the history of changes and notes associated with each article.
Organizing and controlling the visibility of your content optimizations helps streamline the collaborative process, making your content update workflow more effective.
Optimization Log and Progress
Reviewing Previous Changes
To ensure that you are not repeatedly making the same adjustments, check the previous optimization notes for the article in question. If editors have logged changes for an article, these are accessible under the previous optimization log. This helps maintain consistency and saves time.
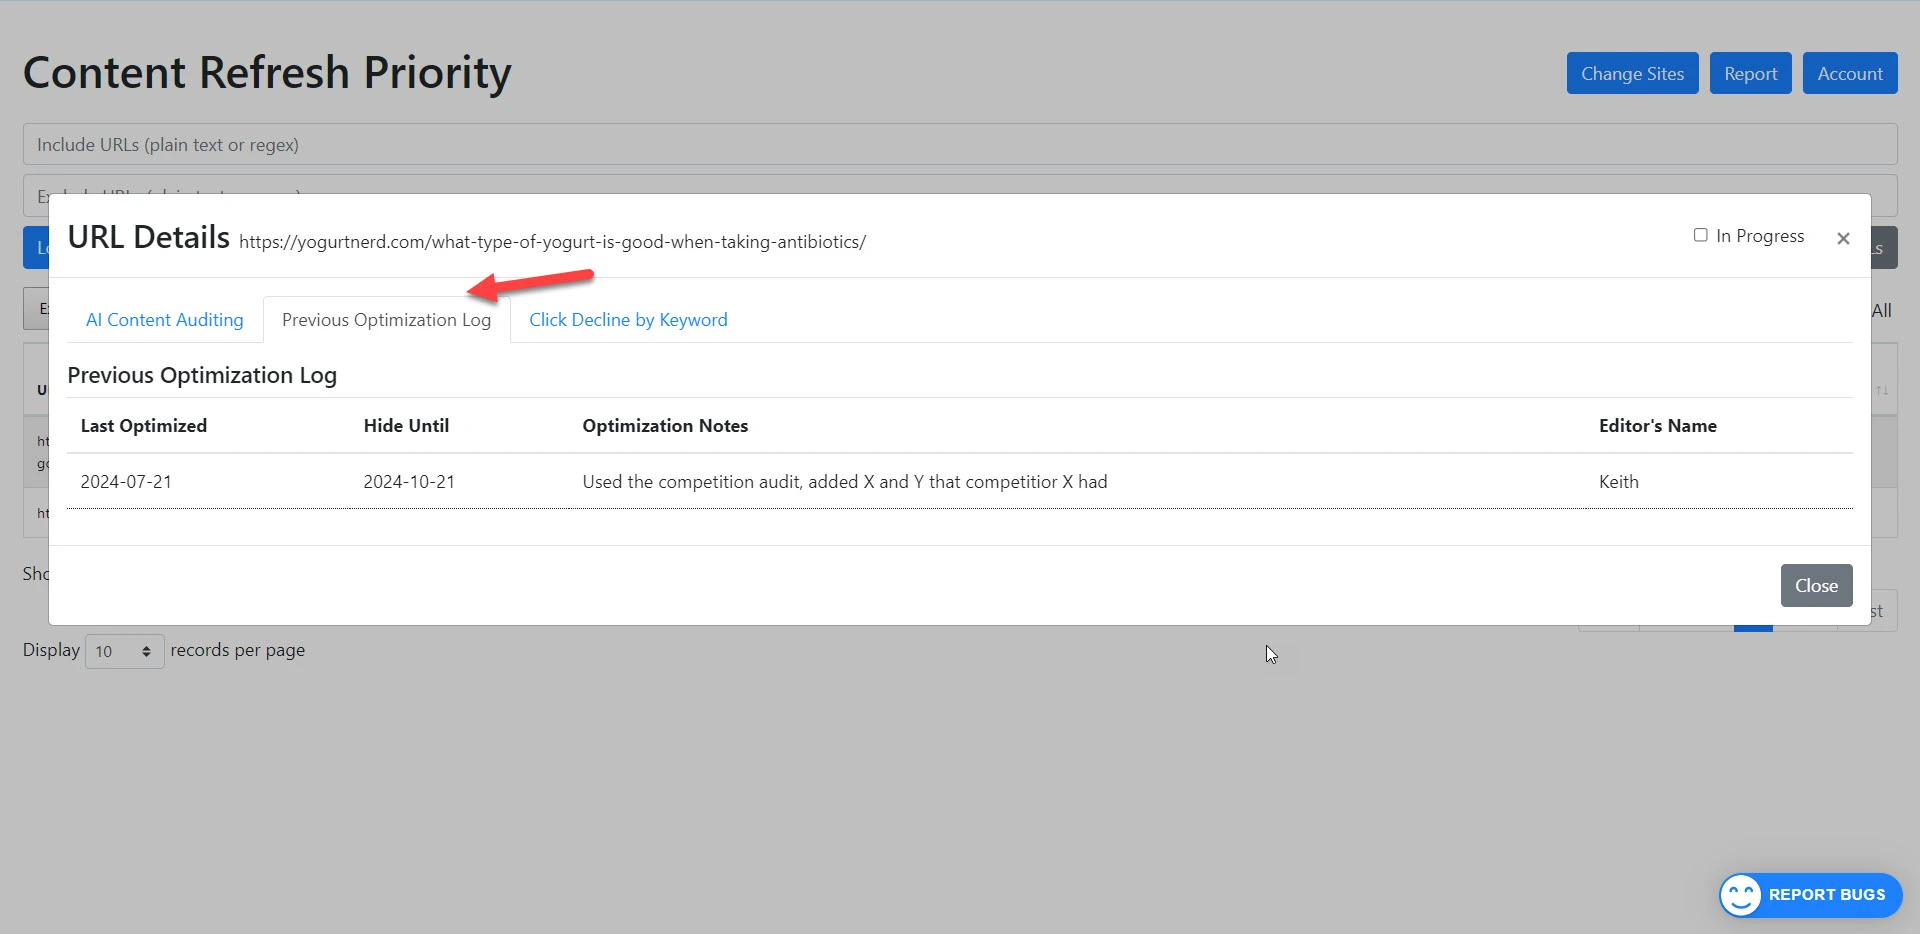
When an article is marked as "done”, the optimization notes will be retained. Review these notes whenever you revisit the article to understand the modifications made and their impact. This log provides insight into the history of changes, making it easier to assess the current performance and decide on future actions.
Marking Progress on Articles
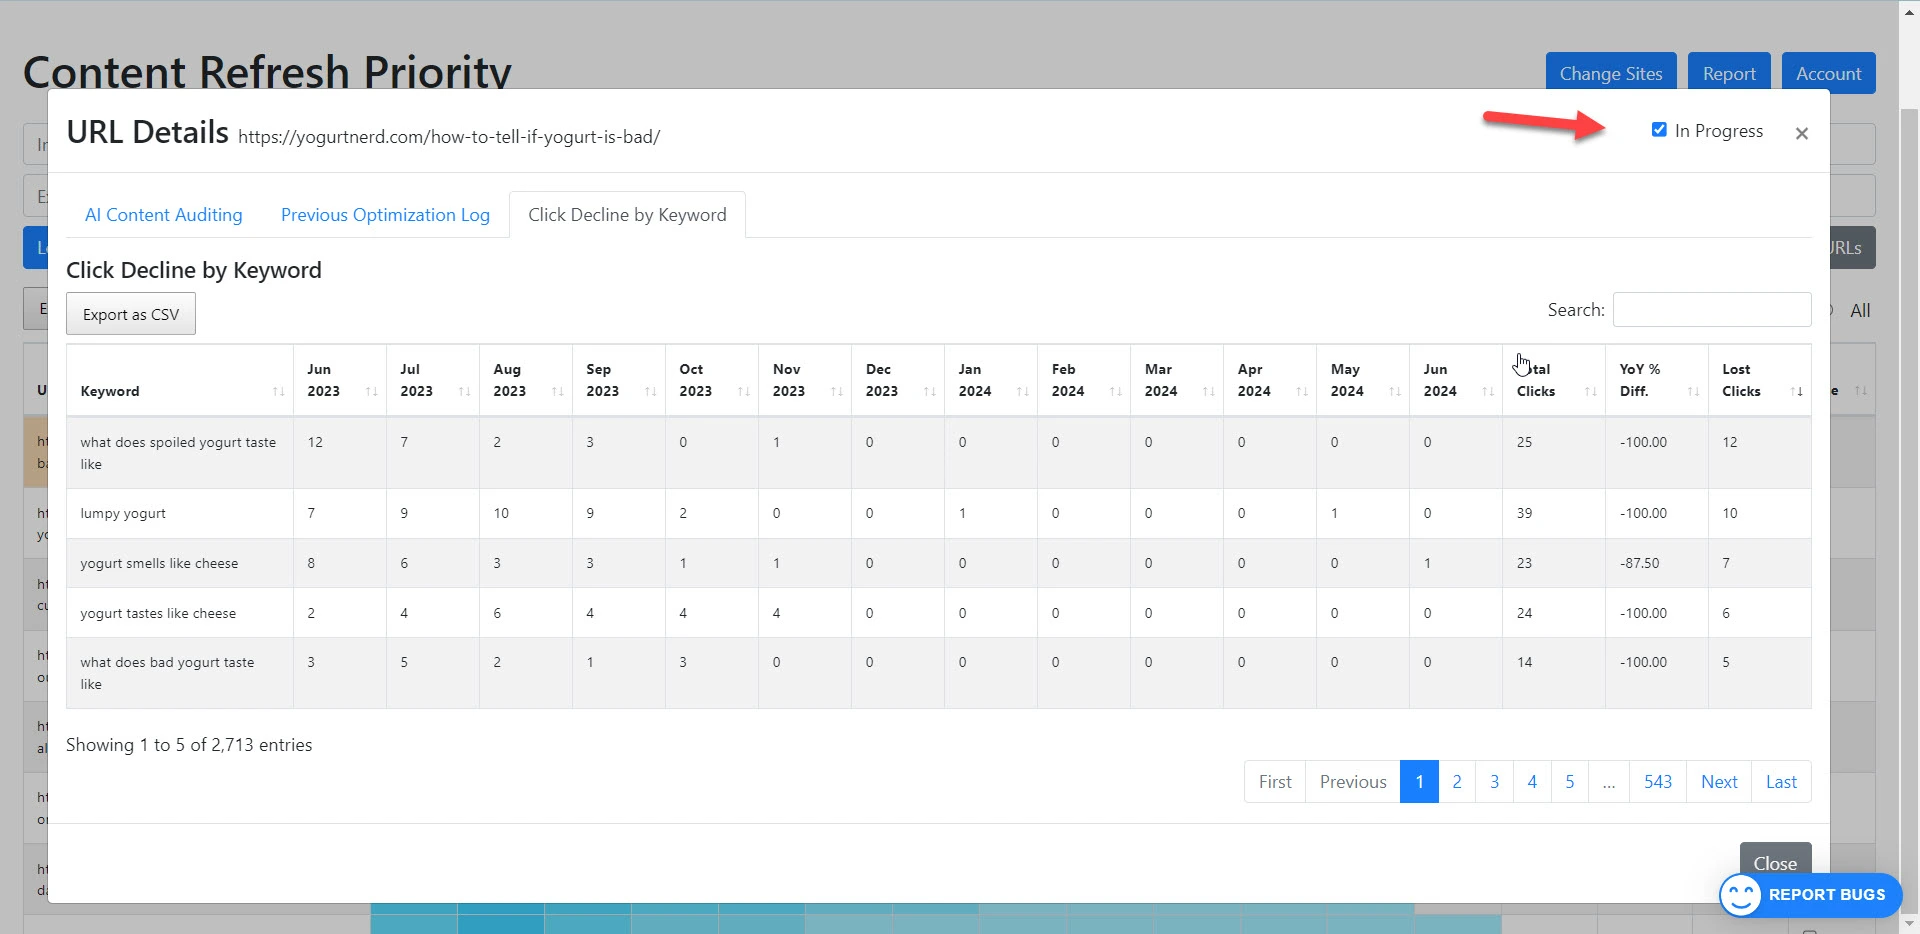
You can mark articles as "in progress" to signify that they are currently being worked on. This is particularly useful if multiple editors are involved. Once marked, the article will be highlighted, indicating its current status.
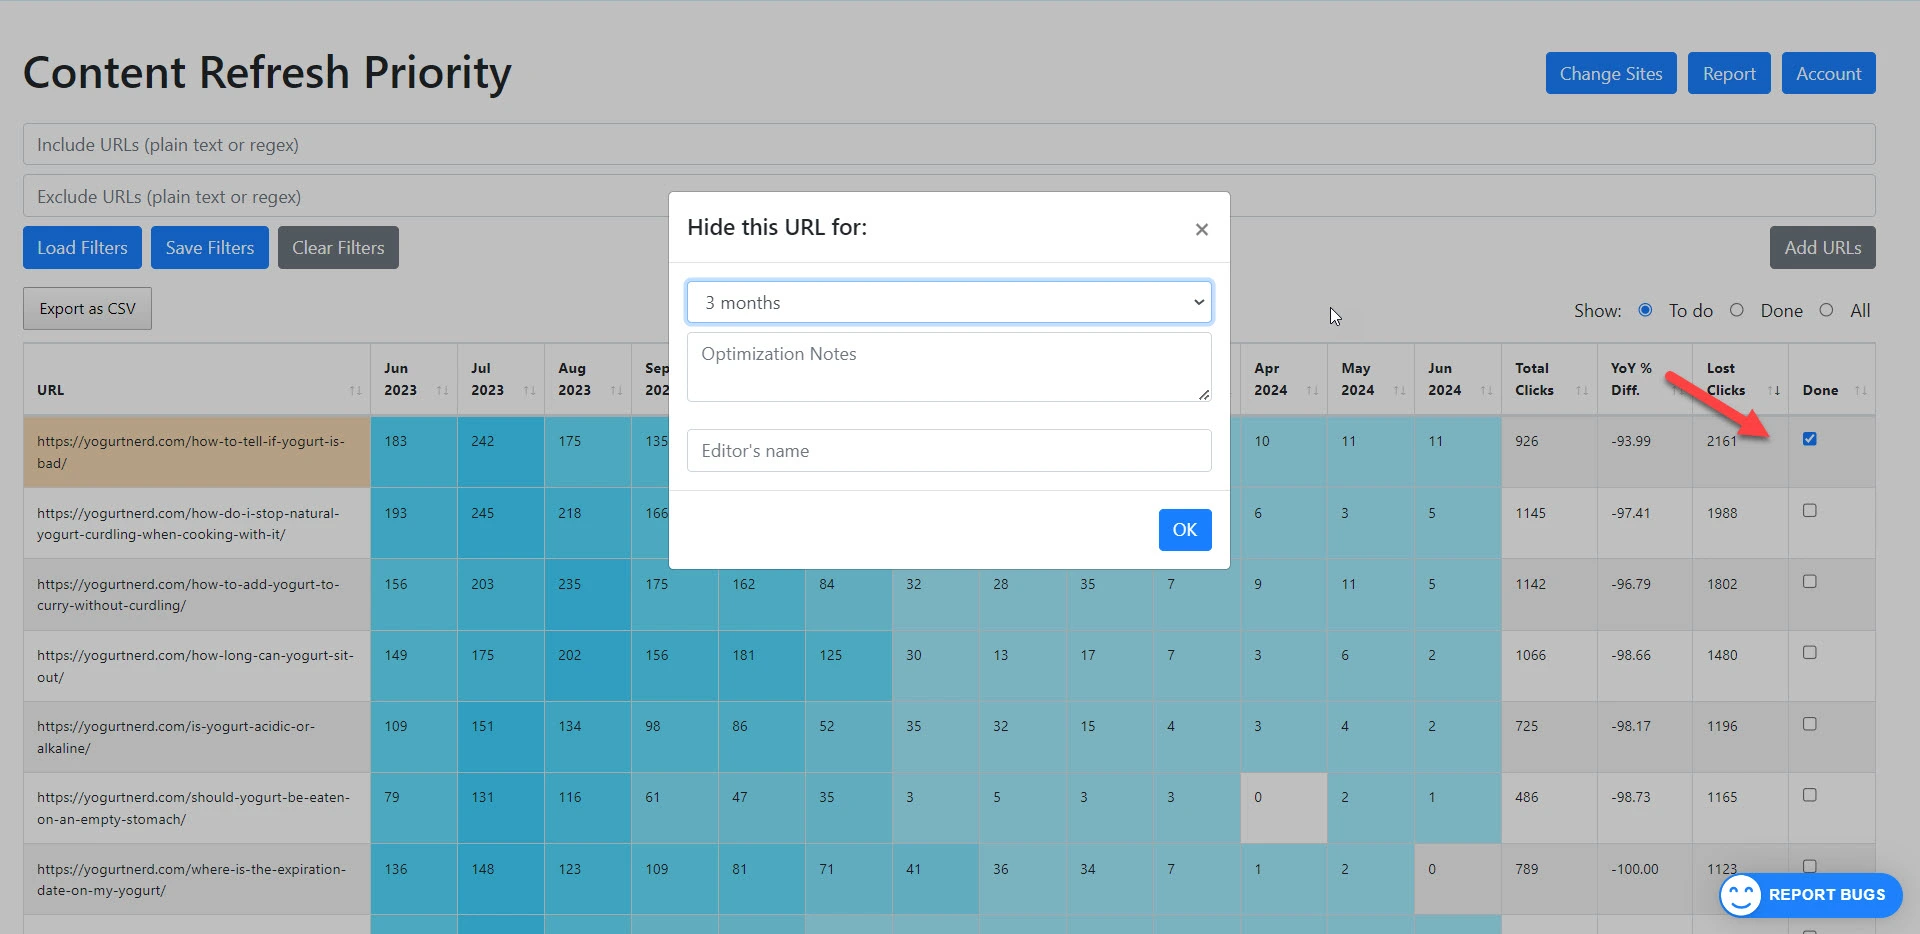
When an article is optimized and finalized, you can mark it as "done" for a specific timeframe. Options include one, three or six months, depending on how many articles you are managing. This feature ensures that articles are left alone to potentially gain traffic without being prematurely re-audited.
Use the "done" checkbox to hide optimized articles from the workflow dashboard. During this period, leave detailed optimization notes, specifying what changes were made. These notes are critical for future reference, allowing anyone revisiting the article to understand the improvements and their outcomes.
Marking URLs as Done
Hiding Optimized Articles Temporarily
When you complete optimizing an article, you have the option to hide it from your dashboard for a specified period. This helps avoid revisiting the same article multiple times before it has a chance to show results.
To hide an article:
- Mark the article as done.
- Choose a time period such as one, three or six months.
- The article will remain hidden until the chosen period ends.
This process is useful for allowing enough time for Google to recrawl and rank the updated content effectively.
Leaving Detailed Optimization Notes
Detailed optimization notes are crucial for tracking changes made to articles. This is especially important if multiple editors are involved in the process.
To leave notes:
- Mark the article as done.
- Record what changes have been made and any insights gained.
- Add the editors name so you know who made the changes
Keeping thorough notes also prevents duplicating efforts and ensures that every update to the article is deliberate and well-documented.
By following these steps and using our content decay workflow, you can maintain a structured and efficient ongoing content optimization process for your website.